What's the big deal? Don't I just melt chocolate like melting butter?
Chocolate, the popular product manufactured by roasting, fermenting, and processing the beans of a cacao tree in combination with sugar (and milk in some cases), is a pretty amazing food. Chocolate (when used in the singular form typically refers to the basic ingredient, while the plural chocolates is often used to refer to candies made with chocolate as a primary ingredient) has a complex flavor that can change and develop as it melts. Since its melting point is just below human body temperature, this means that while eating chocolate, both the texture (as it changes from solid to creamy liquid) and its flavor gradually changes in the mouth. This low melting point does makes it very easy to melt. Unfortunately, chocolate can burn if heated over 200°F (95°C) which is very likely when heated directly over an open flame. This need not be a concern if the proper precautions are taken.
Related Articles
Melting Chocolate
There are several easy ways to melt chocolate. I'll discuss two of the most useful ones.
The microwave oven method is the easiest but works best when using a small amount of chocolate (less than 1 pound). The chocolate should be in relatively small pieces (chocolate chips also work well), so if you're using chocolate bars or blocks, you'll want to cut the chocolate into smaller pieces first. Microwave in short bursts, about 30 seconds at a time, and stir between each microwave session to provide even heating. At some point, the chocolate will be warm and the pieces will hold their shape as you pull it out of the microwave oven, but they will be slightly shiny and mush as you stir it. Keep stirring and allow the residual heat to melt the rest of the chocolate. If done properly and gently enough on high quality tempered chocolate, this method can result in melted chocolate that is still tempered. Heat it too much and you'll lose the temper, so it's important to stop as soon as the chocolate is about to melt.
The double boiler method uses a little more equipment, but gives you the most control while melting chocolate. You can melt larger quantities of chocolate with this method and use larger pieces (up to 2 ounce blocks). Select a heat proof bowl to place your chocolate in. Put about 1/2-in. water into a pot and place the bowl on top of the pot. Make sure the bottom of the bowl doesn't touch the water. Now you have a double boiler.
Put the bowl aside and bring the water to a boil. If you're melting a small amount of chocolate, you can simply take the pot of water off the heat. If melting a larger quantity of chocolate, keep the pot on the heat and turn it down to a bare simmer. Place the bowl of chocolate on top of the pot of hot water and stir the chocolate using a silicone spatula until it has melted. Be careful not to allow any steam or condensation to enter the melting chocolate or it can seize. This is usually not a problem if you are watchful and have a lip on the bowl. You can remove the bowl from the pan whenever you need to slow down the heating process and place it back on to introduce more heat. This will prove vital while tempering.
Tempering Chocolate
When melted chocolate returns to solid form the cocoa butter in the chocolate forms a crystal structure. The strange (or cool depending on who you're talking to) thing about cocoa butter is that the crystal structure they take on depends on the temperature at which they are formed. If the chocolate is allowed to cool on its own, the crystals of fat will be loose, resulting in a chocolate that is dull in appearance, soft & malleable, and greasy to the touch. This loose crystalline structure has a slightly lower melting point than tempered chocolate crystals. If, instead, while cooling, the chocolate is kept at 88°F (31°C), the loose crystal structure will not form (88°F is above the formation point of the loose crystals). At this temperature the cocoa butter actually forms a dense crystalline structure. Holding the chocolate at this temperature and stirring will allow a whole bunch of these stable crystal structures to form providing a lot of seed crystals to form in the chocolate. When the chocolate is finally allowed to fully cool, if there are enough stable seed crystals, then the chocolate will harden into a very stable hard chocolate with a slight sheen, snap when broken, and will keep for months at cool room temperature. Tempered chocolate provides enough stability to be worked into a variety of shapes - sheets, painted onto leaves and peeled off, flowers, cups, and molds. It also helps prevent the cocoa butter from rising to the surface of the chocolate and blooming into unsightly light brown markings or coatings.
To temper, most chocolate books will tell you to fully melt the chocolate and then to pour 3/4 of the chocolate onto a marble slab and repeatedly fold the chocolate onto itself and smear it across the marble until the chocolate is a uniform 82°F (28°C). The chocolate is then returned to the remaining hot chocolate and stirred in. The final mixture is either reheated or the residual heat is enough to bring the temperature back up to 88-90°F (31-32°C). This technique is can be a bit tricky and requires a marble slab (or other large, flat, cool surface like a sheet of aluminum or upside down sheet pan), a plastic scraper for smearing the chocolate (a spatula will also work), and a chocolate thermometer (an instant read that can measure accurately to the degree like the Thermapen will also work fine). The chocolate needs to be worked sufficiently on the marble slab for enough seed crystals to form, so you have to work relatively quickly as the chocolate cools. A good way to tell when you've reached the right temperature and stage is to pay attention to the viscosity of the chocolate. When the chocolate begins to thicken a little, you've reached the point where seed crystals are forming and you should be able to reincorporate it into the rest of the chocolate. The tempered chocolate must then be kept at tempering temperature, 88-90°F (31-32°C) until used.
I find that the seed method (as described in The Professional Chef) is a little easier. Since almost all the chocolate that is sold is already tempered, we can use a piece of this already tempered chocolate as a plentiful source of seed crystals.
Melt the chocolate in a double boiler while stirring to ensure unform temperature.
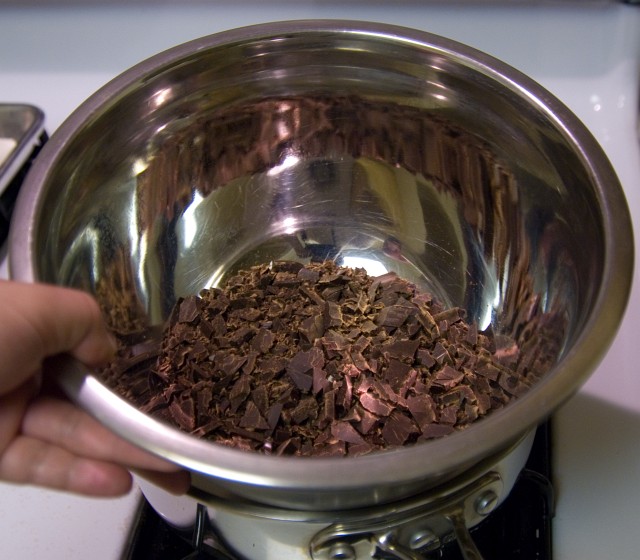
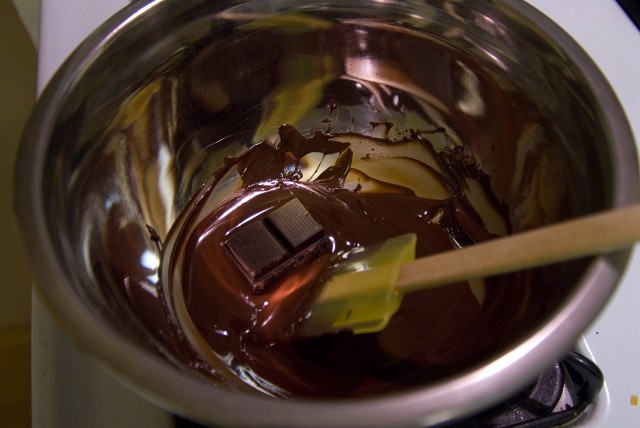 Once the chocolate has fully melted and reached a temperature of over 105°F (41°C), remove it from the heat. At this temperature, all the crystals, loose or stable, should be melted. Add a piece of unmelted chocolate to provide the seed crystals. This piece can be as big as 2 ounces (if you're melting a sizeable amount of chocolate) or can be chopped up into a few smaller pieces.
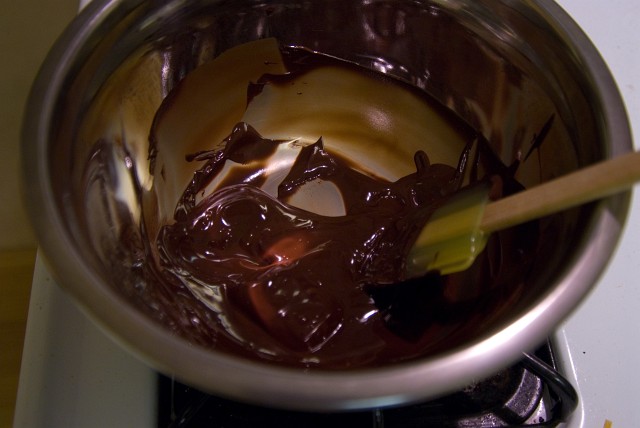 Stir until the chocolate's temperature enters the tempering range, 88-90°F (31-32°C). The chocolate should be kept at this temperature until used.
Specific Tempering Temperatures
Depending on the cocoa butter content of the chocolate and introduction of other ingredients, the tempering temperature of chocolate varies. Harold McGee's On Food and Cooking provides these values for the three broad categories of chocolate:
| Type of Chocolate | Tempering Temperature |
|---|---|
| Dark (no milk content) | 88-90°F (31-32°C) | Milk | 86-88°F (30-31°C) |
| White | 80-82°F (27-28°C) |
Note that although white chocolate does not contain any cacao solids, it is still subject to the same tempering procedures since it is made of cocoa butter.
Storage
Tempered chocolate can be stored for several months without blooming at constant cool room temperature, 60-65°F (15-18°C).
Related Articles

It makes sense - chocolate melts at body temperature (hence the candy shell, in your mouth, not your hand), so 212 F is excessive. Dark and semi-sweet chocolates can handle the higher heat.
If your chocolates develop 'feet' when they are put onto a drying surface, it means the chocolate is sluffing off the center and pooling around it, then the chocolate is still too warm. Particularly when dipping truffles or very soft centers you need to make sure your chocolate is cool enough or it will start melting the center instead of coating it.
Good dipping.
~J
I know this is off topic, but I am making a chocolate cream pie this weekend, and i am trying to figure out how to make the whipped cream topping that is put on top
When I have had it at resturants, and there is a whipped cream-like topping on it, but it is slightly richer and thicker than regular real whipped cream.
Does anyone know what this is or how to make it??
Thanks!!
I'm going to try the oven method of tempering chocolate for my biscotti. I have usually used the microwave, which does work, but you gotta keep a sharp eye on it and check / remove just at the right time. I think with the oven it'll be easier and more fogiving.
p.s. about the parafin comment... My aunt used to make chocolate covered peanut butter balls at Christmas... I used to love them until I learned she used parafin wax to keep the chocolate shiny. That ruined it for me... (boo hoo...) I just can't get past the thought of ingesting parafin anymore. Eating petroleum products seems to me a not-so-great idea. ; )
1. What kind of chocolate can I use? Any kind at all? Hershey's candy bars?
2. What can I do to a bar of bittersweet chocolate to make it sweeter and less bitter, if anything? Is it possible to turn it into milk chocolate myself?
3. I can buy what is called "dipping chocolate" which comes in little round discs, melt it over hot water and immediately use it and it works perfectly. Is this some special kind of chocolate? Is it even chocolate? (Ingredients say it has partially hydrogenated oil and cocoa in it, but no chocolate) Is this stuff already tempered?
3a. If this "dipping chocolate" is already tempered and the Hershey's chocolate bar I might also use is already tempered, what is the difference between the two? I'm under the impression that if I use a Hershey's chocolate bar I would have to temper it before I could use it for candymaking.
4. And, finally, the "dipping chocolate" will not set unless it is put in the refrigerator for 15 minutes or so. Is this true of chocolate that one has tempered themselves?
5. Where does one buy untempered chocolate and what names/brand names would it have?
I'm sure I've left out other questions and would welcome any and all responses, including directions to another internet site or a book on this subject. I'm just not real clear on any of this.
Thank you very much. Alex
1 and 5 are really the same question. you can use any type of chocolate that you like, but there is a big difference in the smoothness and taste of different types of chocolate (generaly the more expensive the higher the quality) All chocolate is tempered when you buy it. that is why it is shiny and snaps when you break it. By melting chocolate you take it out of temper so to restore the shine and the snap you must re-temper. When you buy bulk chocolate it is also called couveture chocolate.
2. bittersweet and semisweet chocolates are both dark chocolate and have less sugar and milk solids in them then milk chocolate does. look for the amount of cocoa that is in the dark chocolate. the higher the number the more bitter the flavor usually the higher the quality as well.
(creating milk chocolate is a long procces requiring conching machines which I don't think are made for home use.)
3 and 4 can also be answered together. dipping chocolate is also known as conffectioners coating and goes through a process where the cocoa butter is removed from the chocolate and an oil ussualy palm kernel oil replaces the cocoa butter, brcuase of the oil the dipping chocolate does not need to be tempered. It is the cocoa butter in chocolate that give it its richness and smoothness so if your making candies that are not ment to immpress anyone just ment to taste good then use the dipping chocolate
but if you trying to do something a little higher end then stick with real chocolate.
if you have never tempered chocolate before it can be very challenging just remember you can always remelt your mistakes. good luck I hope that this answered a few of your questions. Eric
Today is my first time melting chocolate on my own, and I had planned to dip pretzles like my mom used to make. I didn't think that the temperature mattered too much as long as it melted and then got to cool once on the pretzles. I was wrong! After three hours, the chocolate on my pretzles is the texture of fudge: handlable, but not what I want to put on a gift plate.
We discovered (too late) that my chocolate was nearly 200 degrees (F). I found your site and tried to follow instructions, but I'm apparently not good at that either. After cooling to 105 I added a handful of fresh chocolate chips, then again at 88.8 hoping to get some of those elusive crystals. Both times I put a test blot on some wax paper to see if it would harden... no luck.
I now have three bags of chips, and about a cup and a half of high quality bulk chocolate making a gooey mess all over my kitchen. Can it be saved? If so, PLEASE give me stupid-proof instructions!!
Thanks!
Tempering chocolate is a tricky business that requires practice. Since you've got a deadline, you may or may not get it perfect this time around - but you can do well enough to be pleased enough to give someone a gift of dipped pretzels. Since tempering seems to be providing some issues, just take the chocolate chips you've got and heat them until they begin to glisten but haven't actually melted (lost shape) yet. Take them off the heat and try to stir them. If they stay intact, bring in a little more heat (water bath or microwave) and try again. We want to heat it until it just melts and the residual heat melts the rest of the chocolate chips. Once you've got your melted chocolate, they should still be tempered since we didn't bring the temperature high enough to take them out of temper. Dip your goodies and let them set.
If the chocolate has already been melted (but not burned / overcooked), you can recover the chocolate by melting and following the tempering instructions. There's no easy way to do this except for the seed method and, as you've probably learned, that's not always a success. Sometimes not enough crystals have formed, but you can still get a decent snap on the chocolate after it finally solidifies. This is usually good enough to dip foods that will be consumed soon. Just smear some onto a sheet of parchment paper and chill until it's set. Remove from the parchment paper and break it. If it snaps cleanly, it's good enough - if it flexs and breaks off slowly, it's not so good and you'll need to try again.
Considering what other things we eat (and drink), and Breath (lol) an oz or two of wax in your lb of chocolate isn't really a big deal...
Thanks so much!
Depending on the type of mold. Tempered chocolate shrinks as it cools (this is what enables you to unmold them easily, they shrink away from the mold). However, in some cases, chilling will cool the chocolate so quickly that the chocolate can crack because of uneven cooling and shrinkage.
What's a good way of keeping the melted tempered chocolate at 31C-32C ready for use?
A heating pad - the kind you use for a stiff back - works well.
Since parafin wax has been used for years in food products, including canning and as a fat replacement, my guess is that it has not been found to be bad for you. I find parafin wax in a lot of things.
Here is something for you to look for, in Hawaian Punch there is an ingredient called Glyceraol Ester of Wood Rosin. It's a texture modifier so that the puch feels more syrupy in your mouth.
http://www.anoccasionalchocolate.com
my zojirushi bread machine keeps an even temperaure of 88 F during the preheat, kneading and rising process. (most other bread machines have the temperature in the mid to high 90s). i think it would be perfect for keeping the chocolate warm while it is being used to coat the truffle centers.
How would I flavour the plain chocolate without it seizing?
Marble set at room temperature (like a slab build into a pastry counter) is the same temperature as the room. The marble however has a higher thermal conductivity than wood or glass, so it feels colder. The marble blocks are also thick and large which gives the sheet a large amount of thermal capacitance - meaning more heat would be necessary to raise the temperature of the block. Because of this, it acts as a good heat sink. If you had a thick slab of aluminum, it would feel cooler than the marble - but you'd need a pretty thick slab to prevent the aluminum from heating up rapidly as it absorbs heat from the chocolate.
Bees wax will not give the same result as paraffin melts at about 133F and bees wax melts at about 147F. This is a very big difference when you mix it, even in very small amounts with chocolate.
Paraffin is an alkane, or mixture of linear alkanes with carbon chains over usually 20 carbons long. Paraffin is passed through the body completely unchanged/unmetabolized. Beeswax on the other hand is a mixture of compounds and there are occsasionally allergic skin reactionsto it.
My indulgence: Chocolate Truffles
I tempered my chocolate correctly. I dipped butter cookies and they came out fine. I bagged them when they were dry. 4 days later....the chocolate started bubbling, looked like mold and started falling off the cookie. Does anyone know why this happened? I used Callebaut chocolate.
Any help would be appreciated.
Thank you!
Crystal Melting Temp. Notes
I 17 �C (63 �F) Soft, crumbly, melts too easily.
II 21 �C (70 �F) Soft, crumbly, melts too easily.
III 26 �C (78 �F) Firm, poor snap, melts too easily.
IV 28 �C (82 �F) Firm, good snap, melts too easily.
V 34 �C (94 �F) Glossy, firm, best snap, melts near body temperature (37 �C).
VI 36 �C (97 �F) Hard, takes weeks to form.
Making good chocolate is about forming the most of the type V crystals. This provides the best appearance and mouth feel and creates the most stable crystals so the texture and appearance will not degrade over time. To accomplish this, the temperature is carefully manipulated during the crystallization.
Generally, the chocolate is first heated to 45 �C (113 �F) to melt all six forms of crystals. Then the chocolate is cooled to about 27 �C (80 �F), which will allow crystal types IV and V to form (VI takes too long to form). At this temperature, the chocolate is agitated to create many small crystal "seeds" which will serve as nuclei to create small crystals in the chocolate. The chocolate is then heated to about 31 �C (88 �F) to eliminate any type IV crystals, leaving just the type V. After this point, any excessive heating of the chocolate will destroy the temper and this process will have to be repeated. However, there are other methods of chocolate tempering used-- the most common variant is introducing already tempered, solid "seed" chocolate.
may be i have got that ans .
u have used DARK chocolate .
ok when u melt it and after that u rest it so bcoz of air contact it got set over u r cookies ..
now when u baged it u r bag should be airy enough so it doesnt get melt off.
but u may have used plastic bag so it wont be able to come in contact with air and dry out. but bcoz of warm air created inside the bag made a reason to get the chocolate melt off from the ur butter cookies
this is a little past overdue, but paraffin and vaseline are similar petroleum products. the inventor of vaseline lived to be 96 and he claimed he ate a tablespoon of it every day.
a good excuse to eat (lazily tempered) chocolate more often. . . if you need an excuse to eat chocolate, that is.
Thanks!
Thank You!
I have a question though: I was making the chocolate truffles and melted the chocolate with the already boiled heavy cream directly over a flame. I think it burned, but the main problem was that at the end, when I cooled the chocolate, there was some fat/oil mess that looked like it had oiled out or something when I cooled the concoction. What is it and why did it happen?
Thank you SO MUCH!
If the chocolate burned and then resulted in some oily goo, then that oil is probably from the cocoa butter that is part of the chocolate. When chocolate burns, it seizes and oils that were suspended in the solid chocolate can separate. Using the technique where you pour the hot heavy cream into the chocolate and using that heat to melt the chocolate can prevent that.
My fix: After melting the chocolate using the microwave method I stirred and stirred until all the lumps were gone and it began to cool, then I placed the bowl on a cookie sheet that I had cooled in the fridge and stirred until it began to thicken up a bit at a lower temp. It worked, and hardened up really nicely when I used it. Incidentally, you don't have to work as quick with the white chocolate because it doesn't set up as fast as the dark chocolate does.
HELP---does anyone know what causes the chocolate to "spot" after drying? I made chocolate covered pretzels and within 2 days they were covered in spots! I felt they were ruined and didn't want to give them to anyone.
Thank you
BB
Thanks in advance.
Jason
is essentially just that - chocolate melted in hot cream.
it is made - intentionally - thicker / thinner depending on intended usage - but the generally accept "method" to control final consistency is the ratio of (heavy) cream to chocolate.
how carefully are you measuring, and are you using the same brand of product(s) each time?
since you are weighing the chocolate, that leaves me guessing blindly as well.
how big a batch are you making? the reason I ask is: if you are making a cup, small differences in measuring / fat content may be more apparent than when scaled up.
hopefully someone with more experience with "chocolate that goes bump in the night" will help out here.
Thanks,
Donna
Are you trying to cut with a cookie cutter or a pair of scissors? Once hardened, the chocolate will shatter if you try to cut into it in any fancy way (you can probably do straight lines...). What I would attempt is to brush it onto a sheet of parchment paper and wait for it to begin to harden. Before it's completely stiff, cut it into the shape you want (with either a cookie cutter or knife or maybe even shears) and then wait for it to completely harden. Then peel the parchment paper away.
I am doing my first demo on chocolate and handmade chocolates for the first time for the public. Can you please give me some info on what you would be interested in, if you were going to see a demo?
Thanks so much,
Brooke
www.brookescandyco.com
Techniques... I've been to chocolate demos before so if you want specifics, just let me know.
Also, in answer to the tempering... I am a Dove Chocolate at Home (soon to be renamed Dove Chocolate Discoveries) consultant/chocolatier. I can vouch for the Revolation I tempering machine.... sold elsewhere for $349-$400 - Dove sells it at their in-home parties for $199 for customers or as a hostess 1/2 off item for only $99.50!! It is also part of the higher end starter kit. Want to know more... just email me or visit: www.dovechocolateathome.com/sites/mary
Edited by Michael Chu: I fixed the incorrect url with the correct one.
After tempering, what's the best way for the "amateur" to keep the chocolate at 88-90 F while working?
Subject: Making chocolate bowls
Hi, I saw Jacques Torres make the most amazing flower bowls made out of chocolate on PBS this weekend. I'm new at chocolate tempering and made a mess this weekend trying to recreate his masterpiece (he made it look SO easy!) He used balloons with dark tempered chocolate (dipped in the chocolate three times to make the flower effect). Stuck em in regrigerator for 8 minutes then popped the balloon and voila! Needless to say, I tried this many many times and had a host of problems. First, my chocolate didn't turn out dark, hard and shiny like his and second, my balloons kept sticking to the chocolate. Any advice on what best chocolate to use (i'm working on my tempering methods). It appears semi-sweet chocolate chips are NOT the best to use for tempering. I'm thinking dark bittersweet chocolate. Will it be sweet enough to eat the bowls?
Hi Houston amateur, I guess this answer comes terribly late, but I only recently learned myself how to make chocolate bowls. It's explained very well on this site: http://www.kingarthurflour.com/blog/2008/12/23/the-big-chocolate-blowout-chocolate-balloon-cups/
Important is really (I think I also explain this in the comments-section under the name 'Renske') that the chocolate has to be liquid but feel almost cold. You can try this by putting some chocolate on your lip. This is very important!
I used dark chocolate, 'Callebout', and this was sweet enough. The trick with the balloons not to stick (this is also where I got frustrated) is to let the air out at the tip of the balloon and not in the middle. Then they will deflate slowly. After a while you will get the hang of it. I would put them longer in the fridge than 8 minutes though, but maybe you have a fancier fridge. With fridge I mean the one that is around 6 degrees Celsius, not the under zero fridge.
On another note, if I am making truffles at home and I want to dip them in chocolate, and I am only giving them to my husband (who won't care about bloom on the chocolate),
a) do I need to temper the chocolate?
b) or should I just use dipping chocolate or candy wafers?
Thanks!
a) do I need to temper the chocolate?
In this case, just melt the chocolate and coat those truffles.
:P
I used 23 ounces of milk chocolate chips (Ghirardelli) and 1 cup of whipping cream to get a perfect ganache (instructions were great). Many other websites listed the conversion for dark vs milk as 1.5:1, so this seemed pretty good. This made about 60 truffle balls which I split into two cookie sheets (with a sheet of wax paper on each).
I had another 11.5 bag of milk chocolate chips for the shell, which i split into 2 groups...one for each cookie sheet. The first time, I put the chocolate chips in small pot, heated it by resting it in a slightly larger pot with hot water on the stove, got them just to start getting melty and then removed them from heat and started stirring. This made a great syrup that I could roll the ganache balls in. Key hint here, don't be stingy...when I do it again, I'll probably do another layer (or maybe two). I was doing 2-3 balls per slathering of chocolate on my hand and I would say either do that with multiple layers, or do one slather per ball.
The second batch was not good, but it was interesting. I don't know why, but I immediately started stirring the chips when i put the small pot into the larger pot. What I ended up with was a mass of chocolate that was not melting at all and a finger poke confirmed that it was very very hot. It never did melt (and for fun I nuked it and that turned it into a frothy nightmare...so I coated the rest of the truffles in sugar powder). I don't know why, but don't touch the chocolate until it starts to melt.
Oh, and the truffles came out close to most decent chocolatiers in terms of quality. They usually charge $2-5 per truffle and I spent $15 on supplies (including the chocolate mass in the trash) and got 60 good sized truffles why were well loved by my party. I didn't have a melon baller, but I used a metal teaspoon ring thing that that worked (I don't remember which one i used, but it was one of the rings). Thanks for the instructions!
If I want to make chocolate almond clusters, do I have to warm up the almonds before mixing them with the chocolate? Is there a special way of handling ingredients in clusters (temperature-wise or otherwise) to guarantee success and avoid blooming?
The amount of chocolate that enrobes the truffle center is very little, so it won't melt the center. In fact, the center will probably be cold enough to cause the chocolate to harden rapidly around it. Just take some melted and tempered chocolate, put it in your palm and roll the truffles through them. Just dropping the truffle into the tempered chocolate will cause them to melt. See the Chocolate Truffles recipe recipe to see an example.
2) My first tempering project is massive... a 35lbs 3' chocolate bunny.. I have the mold arriving today.. I've started testing the process with small amounts of chocolate and am waiting for the mold to arrive to scale up. I'm guessing stirring is important, but the process seems different from say, ice cream, where you are trying to prevent the formation of large scale crystal structures causing ice cream to taste brittle... so my question is, is it better to stir or not to stir? Overstir? Understir? I get the feeling that without *some* stirring, no crystalline structure can form, as the molecules are probably not mobile enough, even in vaguely liquid form.
My game plan is to melt in a very low oven (with a few high heat capacity absorbers to moderate the temperature). Then I'm figuring that while stirring the temperature down, the chocolate will spend a great deal of time cooling very slowly (for a large thermal mass, only the outer surface will actually conduct/radiate heat away, so volume/mass ratio is high, which should cause very slow cooling... though mitigated by stirring). My hope is that if I stir it in a big vat, the chocolate will spend a lot of time at or near 88F.
This is going to be a lot of fun.. and I do hope it goes well.... as for first attempts at molding chocolate, we sure picked the big one. :)
Thanks for any pointers in advance.
--fooburger
After both set, the control batch was very fudge-like, dull and dark in color, and wasn't even close to being brittle enough to crack.
The experiment was shiny, brittle, and cracked just like a chocolate bar.
One 35lbs. chocolate bunny coming right up!
Thanks to CfE for getting me there... I really appreciate it. I might post a pic of my 35lbs chocobunny when it's finished.
http://fooburger.blogspot.com/2009/04/tempering-chocolate.html
-fooburger
That's a great picture showing the difference between tempered and untemperered chocolate. I'm glad CFE was able to help you out in your own experiments (that's what this site is for - to get people interested and with enough information to try and experiment on their own!)
I have the good fortune to own a 14 inch high antique copper chocolate bunny mold. I've always wanted to mold some Easter bunnies, but never had the nerve until I read your instructions. I've had no problem with the tempering, I just can't get the bunny out of the mold in one piece. Should I have sprayed it with something???? I'm putting it in the freezer now in the hopes it will shrink away from the mold...but the refrigerator didn't work, so I don't hold much hope. Do you have any suggestions??? I have to finish this today!
Thanks so much
http://www.navitasnaturals.com/products/cacao/cacao-butter.html
I want to use it to make white chocolate, using honey as the sweetener instead of white sugar.
Can anyone point me to a recipe?
Also, I'm currently storing the bricks at room temperature - can I freeze them?
Thanks!
Thanks so much!
I hope you can also visit and see our blog that is available for some guide to chocolate tempering, chocolate candy making, and chocolate tempering equipment.
Everyone's welcome : http://www.allchocolatetempering.com
Thanks a lot.
Alexander Barbara
Did you even bother to read the article? Chu presents a simple three step tempering process complete with pictures. Three steps. Maybe you didn't get to it - start reading at "Melt the chocolate in a double boiler while stirring to ensure unform temperature." where the picture of the bowl of chopped chocolate is. Then stop reading at "The chocolate should be kept at this temperature until used." With the picture of the completely melted chocolate. Read the rest if you want to understand tempering though.
1. NEVER put tempered chocolate in the refrigerator. It causes fat bloom.
2. Keep water as far away from the chocolate as possible. It causes sugar bloom.
3. Coating chocolate (what you'll find at most stores), and Nestle (and other generic) chocolate chips are not for tempering. They contain oils to increase their shelf life.
4. Tempering chocolate in the microwave is a surefire way to scorch your chocolate, a double boiler is the easiest and safest way.
4b. Do not leave the heat on the water of your double boiler and don't allow the water to touch the bowl with the chocolate.
5. If tabling is too messy you can also do the seed or block methods.
Seed: Melt down your chocolate, add pieces as needed to cool. Once they stop melting in the chocolate, stop adding seeds and remove chunks.
Block: Melt chocolate, add LARGE block of solid chocolate and stir until reduced to temperature. Remove block.
I am relatively new at tempering, but my last few times were perfect. I used the double boiler technique, but I also use the Callebaut Mycryo to temper. I am not a sale rep or anything of the sort, but tempering with that product makes everything easy, reliable and a one step.
You just need to melt the chocolate to 40C, let it cool to 34C, add 1% of the total chocolate amount of Mycryo, mix and let it cool to 31C. This for dark chocolate. Easy easy. I made my chocolates molded with plain ganache and they came off the mold shining and didn't bloom at all.
You can use Mycryo for other things too, but I haven't tried yet. It is not too expensive and it is sold in US by Chocolove.
I am going now to use silicone molds and see what happens. And I am also going to try making decorations with white chocolate in the mold. Fun!
Oh! Mycryo is just Cocoa butter, tempered and in powder form. That is why it brings the melted chocolate crystals to the beta form they need to be when tempered. It is like seeding, but easier.
I expecially found that using the heating pad to keep my chocolate at a proper temperature very helpful - as I was dipping approx. 400 truffles total. I did this in three batches - the first batch the chocolate still heated above the 88� I needed it to be at while on the heating pad. So the next batch - I prewarmed a glass dish on the heating pad - and once I returned my chocolate to 118�, I poured the chocolate into the prewarmed pan - and viola! the chocolate stayed at 88� degrees - and the truffles turned out beautifully.
The double boiler pan held onto too much heat - which transferred to the chocolate even after removing it from the heat source - so taking it out of the pan was my secret to success.
Happy chocolate to everyone - thanks for all the good informaton
I want to temper chocolate and add in bits of candy to it. If the candy is flavored with peppermint extract that has water in it - will that affect the chocolate or does it not matter because the candy is already hardened?
Thanks!
Only becomes grainy if you overheat it. Short bursts and stirring to see when it just begins to melt is the best way to use the microwave. As soon as it begins to melt when you stir it, you need to stop microwaving. If you microwave until the chocolate looks like it is melting, it may be too far.
1. Is tempering the chocolate for this project necessary? Some will just be chocolate coated, others will have 'toppings' added.
2. What would be the best chocolate (block, chips, bars, etc.) for this project?
3. Some recipies call for freezing the bananas first, and others after coating. Since I want to make them at home and keep frozen until the sale, do I freeze them before I dip/coat them?
Thanks in advance for any help you can offer.
and 'without the proper equipment' to hold the exactly right temperature, dipping on site would be really tricky. if chocolate moves off it's 'ideal' temperature results are not good - ranging from grainy to goopy.
I would not recommend freezing the bananas - did that once and was not happy with the resulting texture-post-semi-thawing.
whether it's necessary to temper is a valid question - I've done with without worrying too much about the temper - just refrigerate the bananas, melt & dip, drain & cool to set, keep refrigerated until served. you'll likely not get a glossy sheen or a snap to the coating (except by accident - which does happen!) but kids don't seem to mind.
I have been having the same exact problem! However, I am tempering by hand (melt, cool with tempered chocolate seed, re-heat to tempering range).
I am very careful to keep the temperature between 89-90 (for dark), I stir constantly, especially before dipping the next truffle. I cool both the molded and un-molded chocolates in the fridge for about 5 minutes.
Result: The molded chocolates are very shiny (so much so that at first I thought they had melted!) but the un-molded are not shiny at all. They seem to be in temper - no bloom, can be handled, don't melt easily, etc - but just not shiny.
Any ideas why?
I'm having the same problem. Once the chocolate cools down, the dark spots form. I wanted to figure out what causes this?
Wali
Thanks so much for your help
Bridget
but if you read the thread, storing them in the fridge/freezer not a good idea - that can produce spots on the chocolate. a cool place, but not refrigerated.
Dark 88-90�F (31-32�C)
Milk 86-88�F (30-31�C)
White 80-82�F (27-28�C)
wouldn't that work just as well? In other words, if you never take it out of temper (i.e. go higher), wouldn't that keep it at a working temperature? I guess the trick would be to have some type of super-accurate (digital?) electric skillet? Is this do-able?
inherent to that process is heating it up and carefully cooling it to specific temperatures.
here's a good description:
http://chocolatetempering.net/abouttempering.htm
Could you please read that and let me know what you think? I'm intrigued and thought that if there was an extremely accurate way of controlled-temperature melting, that this method might work. I just don't know how to do the melting accurately without the tedious microwave-it-and-keep-checking method. Thoughts, please?
inherent to that process is heating it up and carefully cooling it to specific temperatures.
here's a good description:
http://chocolatetempering.net/abouttempering.htm
Alternatively, I've used a temperature controlled water bath (a rice cooker hooked up to a PID temperature controller such as this one which regulates the temperature within 1 C°) to melt chocolate that I've put into ziploc bags. After melting, the bag can be snipped in the corner and the chocolate squeezed out (or it can be opened up and scooped out).
--Michael
I cut the tip off the bag and filled the molds- the end product was spectacular! While this method was by no means fast, it didn't take any effort.
Thanks!
Am I just not used to a better chocolate or do I need to lower the temp more to get a thicker coating on the fondant? The room is 65* and the humidity is at 46%.
Thank you in advance for any help you can give me.
Does this mean I'll be making any sort of confectionery items soon? Probably not. . but I'll hold onto this thread for references if I do. :)
I was a little nervous making the chocolate the first time because I had failed so many times before that I wasn't even sure if I COULD succeed. In a video I had watched on tempering chocolate, the instructor mentioned seeing a "shiny" characteristic to the chocolate once it was deemed "tempered" and ready for molding. This, by the way, was absolute nonsense because chocolate is shiny when it's melted, regardless of whether it's tempered or not. Minus points.
I'm SO happy now that I got the hang of it though!! It's like ochem lab, except I get to eat the product!!! Oh man, I love making confections, they're way more exciting to make than other foods.
So I made a dazzling set of chocolate-covered banana chunks, peanut butter-filled chocolates, and truffles. I'm so amazed by chocolate itself; it's just so good. So good. Sigh.
So, basically the easiest way is to either heat the chocolate slowly so it doesn't lose it's temper (and neither do I!) or
Heat it in short bursts in the microwave until almost melted and then stir until all of the chocolate has melted through.
Am I oversimplifying it? Do I really have to do the temperatures? Please someone tell me "no"!
I am a simple person obviously!
Both those techniques only work if the chocolate is already tempered (like bar chocolate). They both heat the chocolate just enough to melt, but not disturb the fat crystal structure. If you over heat, then you'll need to follow the temperatures to temper the chocolate again.
i dont have any malting choclate in the house however i do have normal eating chocolate, can you use your method with the pan of water and bowl when you are melting normal chocolate?
thankyou
i dont have any malting choclate in the house however i do have normal eating chocolate, can you use your method with the pan of water and bowl when you are melting normal chocolate?
thankyou
Normal eating chocolate is sometimes the best kind to use since it's typically tempered already. Take a quick look at the ingredients - it should just say: cocoa/cacao solids, cocoa/cacao butter, sugar, lecithin and vanilla. If it has other stuff in it, it's probably more chocolate candy bar than pure chocolate.
Yes, as long as the ingredients are still pure (it hasn't been mixed with other stuff for candy making or something else and then you attempt to retemper - that's not going to work)
thanks in advance .
http://mehditruffles.blogspot.com/2011/02/sous-vide-tempering-is-whats-next-in.html
Thanks,
Mehdi Chellaoui
[/img]
http://mehditruffles.blogspot.com/2011/02/sous-vide-tempering-is-whats-next-in.html
If you don't have a tempering machine, but do have a sous vide setup, then using your water bath to temper chocolate is the next best way to go. (Tempering machines have some more complicated cycles that aren't going to be convenient to mimic in a water bath, but it will definitely be better than any fully manual techniques with high temperature error like double boilers.) Sous vide chocolate tempering is on my list of articles/topics to cover in the sous vide series.
Regarding your seeding method, your picture shows what appears to be a snazy chocolate bar being used for the seed, so I just thought I'd mention that any chocolate you buy will be tempered despite it's scuffed appearance; those are just scratches from rough transport, the cocoa butter crystals are all fine.
It also helps to give the seed a good fine chop-chop to help it melt away quickly (if you are instead leaving a solid piece in and then removing it once you're down to temperature, that is what I would call 'using a boot').
Buying chocolate, avoid 'melting wafers', but anything labeled 'couveture' will be good.
Some words of advice from a pastry chef and irregular chocolatier!
tempering changes the crystalline structure of chocolate (compounds) which allows it to cool in a hard(er) state and with a shiny surface.
those two qualities - texture and appearance - are used for a whole bunch of stuff. enrobed candy centers, crisp coating on cookies, a 'crisp' topping for softer baked goods -
if you don't want the chocolate to melt & stick to your fingers, tempering is one way to get there.
the reasons for chocolate blooming are numerous - there's a lot of info on various sites (search: "chocolate blooming") - pretty much any slight mis-step can trigger blooming.
Rachel from Edinburgh, UK
Mike
see:
http://candy.about.com/od/candybasics/a/candytemp.htm
for a recap on temps and behavior
Every year I make chocolate Truffles with different centers. This year I decided to make the liquid centers (mint, Bailey's, Vanilla bean, etc) and for the first time am using new Silicone molds. I am using Baker's dark semi-sweet chocolate squares. I tempered 18 squares to perfection using the seed method explained here. They're very shiny and come out of the mold easily. They crack in the mouth when we sampled them. The only problem is that I've noticed what seems to be cocoa-like powder spots on the sides of almost half of all my Truffles. I know they have been tempered correctly; I was very careful. I've never had these lace-like spots before; but then I always hand-dipped my Truffles. I had washed, rinsed and air-dried my molds the night before to make sure they were dry. Before filling the molds with chocolate in the morning, I noticed dried water spots on the inside of the molds. But didn't think that this would cause any problem. It did as described above. So for the second batch of truffles I tried washing the molds, rinsing, towel dry then air-dry. Same problem. What am I doing wrong? Also, If I towel dry the insides of the mold too long ( to make sure there's no water); lint from the towel sticks to the mold and I have to re-start the process all over..Please help....I still have 10 batches to do before Christmas. Thank you in advance
Using my freezer, my microwave, my pocket knife, a bowl and spoon stolen from the dining hall, my roommates hammer (crushing candycanes) and a file-folder covered in aluminum foil, I was relatively successful, in terms of flavor and impressing my friends. The principal drawback was that I had to keep the peppermint bark refrigerated otherwise it would become very soft, almost fudge-like, especially the white chocolate layer.
I read this page looking for a way to possibly raise the melting point of the chocolate so that it would set up better. One of my main concerns is, that the white chocolate is already somewhat soft and malleable in its packaged form at room temperature, before I try this again, is it even possible for me to temper it to a state which it will become more firm at room temperature than its original state?
It's worth noting that I do not have a thermometer and I will still be using the same ingredients, however, I have been able to acquire a bag of much more solid Dove white chocolates which I hope to mix with the Hershey's hoping that using that as a seed might help. Furthermore, how does the introduction of crushed/powdered peppermint into this white chocolate mixture affect this process? Is there an optimal temperature/step in the cooling process which to add it?
I also wanted to make the peppermint flavor more prominent, and I am concerned as to the effect of introducing some type of peppermint flavoring or extract into the white chocolate mix. And finally, when I allow each 3-4mm layer of chocolate to cool on the aluminum foil, should I stick it in the freezer as I did last time? or let cool at room temperature?
If anyone can address any part of this, I will be very appreciative.
Thank you,
Dixon, Tufts University 2015, prospective major: chemical engineering.
yeah, pretty simple actually - successfully working with sugars and chocolates is not a "oh well whatever" type of event.
since you don't have either the experience or the equipment to tackle the project, it's gonna' be a sticky ride.
the only trick I know to make chocolate "harden" without knowing what you're doing is to add paraffin wax.
Forgive me for wanting to learn. Trial and error is definitely the best method if I want to get a deeper understanding of these processes. Seeking expertise as to why something happened the way it did is dumb way to learn. That's definitely not the way we do things at Tufts University. I only asked about half a dozen variables, so therefore it shouldn't be too difficult to isolate each variable through the scientific method and test each one. Deferring to someone who has more experience than I do for a few pointers is just frivolous.
�M
I can't figure out if the tone is sarcastic or not. His first post poses a difficult question - how to get chocolates (meant to be consumed as a confection and not utilized as an ingredient) to behave in a specific manner without the use of tools which are generally considered basic to the working of chocolate and sugar (most importantly an accurate thermometer). His next post (in response to Dilbert's comment that working with chocolate isn't like stir frying - precision and accuracy are paramount) claims "trial and error" is the best way for him to learn and asking other people is "dumb" (but isn't posting a question the same as asking for expert advice)? It sounds like DM has also come up with a series of tests to work on all the variables in his project, but then why would asking for advice be "frivolous"? I'm so confused.
If you're going to ask for advice, check the attitude at the door. If I've misread your tone / meaning, I apologize, please restate how you would like us to help.
Oh, and you really have to get a thermometer if you want to work with chocolate and sugar. Trial and error only works if the experiments are repeatable and without the proper tools, that's just not possible.
Or schools!
Or schools!
Well, it's unfair to judge so quickly... he's still in school. It wasn't until a couple years out of college that I realized what parts of that I had managed to learn was practical and useful to being an engineer.
Using a very clean and dry stainless steel bowl, hot and cold water baths, and stiring constantly. using the temperatures you've already covered above.
You are able to temper the chocolate in with less error (once you get the hang of it), less mess, less wasted product, and with equipment that nearly ever kitchen has. I'm not sure about you but most kitchens don't have an abundance of marble slabs.
The processed packaged white chocolate available to me is somewhat soft and malleable to begin with, is it possible for me to temper it to a more firm state? And by mixing it with a firmer white chocolate (and/or using that as a seed), which I have a small quantity of, does that help?
What effect does the introduction of crushed/powdered peppermint candycanes into the white chocolate have on the way it sets up? Do the sugars interact? If so, in what way? Would it be more beneficial to add it before melting? While at its heated phase? just before it begins to solidify?
I mean, in my previous sarcastic response, I did indicate that I could test these variables and figure it out on my own, which is true, in fact I would love to spend a weekend on it, had I the resources. However, amid finals and the fact that I'm not presently pulling in an income, that could get expensive monetarily and time-wise, so deferring to those who have more experience and expertise seems the more prudent course so I can have a more focused baseline.
I don't take organic chem until next term, but it is what I'm studying so I'm at least familiar with a modest level of chemical principles, so feel free to get technical with the explanation.
Again, thank you,
DM
Since candy canes are hard candy, to return them to a liquid state for the sugars to interact to possibly mess up your chocolate would probably have to happen at a very high temperature. A temperature unlike the nice and cozy 80ish degrees required for tempering. I'd say, throw those candies in there and give it a whirl. It's bound to be great. But what do I know, I'm not an engineer, but my chocolate sure does taste damn good :)
melting point: primarily affected by the amount of coca butter in the source chocolate. it's not practical to "remove" coca butter; not sure it can even be done.
tempering: the process of heating then cooling chocolate to certain temperatures affects the granular structure of the sugars. that in turn affects how 'shiny' the cooled product is and to a degree the 'crispness' of the chocolate. chocolatiers / confectionery experts expend entire careers getting it right and becoming expert.
the tempering process varies by the chocolate you start with - more on that later. it revolves around rather precise temperatures +/-5 F degrees, or less - to the experts. I'd hazard a guess the human eyeball can't manage the degree of temperature control needed, and for the most part, it's too hot to stick your finger in, even if you've got a calibrated digit. bottom line: you need a thermometer and you need to know the target temps and yes it's going to be trial and error for the source chocolate you use.
You don�t need a $100 instant read thermometer doohickie � the temperature of a chocolate mix just isn�t going to change all that rapidly.
Start here: http://chocolatetempering.net/abouttempering.htm
source chocolate: off the shelf white chocolate in a candy bar type product is not apt to work - you've proven that. same for milk chocolates. some "dark chocolate" might work, or not. there's more to in the difference of milk chocolate vs dark chocolate than color.
The wax: paraffin wax doesn�t change the melting point of the chocolate itself. It simply �masks� the melt point with a harder substance. Add �too� much and you�ll taste / mouth feel the difference � it�s a small crutch that works in limited situations to a limited degree.
It�s clear you have limited resources � financial, practical (shopping for food at CVS) and equipment wise. All that aside, you need to research a bit about what you�re doing, and you�ll need to start with the �right stuff� � which is not likely to be found in CVS.
Every brand / purveyor of �chocolate� will be different � that�s the trial and error part. But you need to start with a suitable chocolate. Off the shelf store candy bars may succeed to a very limited degree in dark chocolates, the rest � well, you�re probably wasting time and money.
People have been trying to make gold out of lead for centuries � okay, it�s not an exact analogy � but it�s close. Do some basic research on the hows and whys before working on the perfect bark.
Oh, the crushed candy canes � unless you over heat everything to the point they start to melt, they don�t affect the outcome.
Yeah, sorry. I wrote the article five years ago and that's how I learned to do it. I currently temper my chocolate in a ziploc bag in a temperature controlled water bath, but I really like your nested bowls trick.
Technically, there's nothing really going on with the sugars. We're melting different crystals cocoa butter and letting the ones we want (the ones that produce snap and shininess and stability) form by holding the chocolate at the temperatures where the cocoa butter crystal formation we prefer to form.
The temperatures are actually quite comfortable to the touch. At most feeling warm/lukewarm and none feeling hot. If it's hot (like ouch hot) to the touch, it's too hot. Unfortunately, like Dilbert said, it's not going to be possible to tell with your finger if you've hit the right temperatures. You can see this (as an extreme example) by taking your finger and submerging it in a cup of water - note the apparent temperature. Now, dunk your finger in ice water for a few seconds, wipe dry, and submerge in the first cup - it's going to feel considerably warmer than before. This is extreme, but even with a few degrees of difference (hands were in pockets, it's a colder day, you haven't eaten in a few hours, just drank some soda) you're human finger thermometer is going to be off. Unfortunately, everything about chocolate is expensive compared to many of the other things that can be done in the kitchen. I think that's one of the reasons why people are so welcome to receiving chocolates as gifts. (That and the fact that it's really finicky if you've never worked with it before - prone to seizing [turning into a dark crumbly mess] and other nastiness.)
Yeah, those candy canes won't affect anything. The melting point of sugar is so high that your chocolate would have burnt before you even got close. (Burning chocolate results in a sudden darkening of the chocolate at the same time as it does something weird - like curdling - forming a mostly unrecoverable mess... so don't over heat it. Use gentle heating techniques (like in a bowl over a bowl of hot water or gentle steam or brief exposure to microwaves [a few seconds at a time]). Also, don't let water get into it... it seizes (looks like curdling).
I posted about my mom's method of melting chocolate above... I will be tempering chocolate on Friday using this same method for dipping cake pops. After reading 11 pages of posts, I'm going to take my chocolates temperature because now I'm very curious at how she always achieved great results without a lot of effort. (she passed away at 51 so I can't ask her)
For DM, look for a cake decorating store in your area. They normally carry good enough chocolate for around $4 a pound. I concur with the boys, don't use candy bars. It's common sense for me, but that's because I grew up with a cake decorating mom and amateur chocolatier in the house.
I live in Scotland and have done many courses with a Callebaut Chocolate master at Cocoa Black. She told us never to wash the polycarbonate chocolate moulds. (When making moulded chocolates for filling and closing). After each unmoulding of chocs, use a hair dryer to melt any remaining chocolate smudges on your mould. These will then wipe off easily with a sponge or jaycloth. Then you MUST polish the inside of the chocolate moulds with cotton wool to create the most fantastic shine on your next batch of chocolates. Any residual cocoa butter remaining in the moulds will help to unmould the chocs if you have polished them well and tempered your chocolate properly. Also use the hairdryer to take the chill off the moulds slightly before filling. Good luck. Hope this is in time for your Christmas chocs!!
It sounds like using the seed method with your particular chocolate isn't working. You will either need to experiment with other brands of chocolate or use the temperature controlled method of tempering. If you are planning on selling your chocolate coated confections, then I highly recommend finding a way to temper by controlling the temperature of the chocolate for long periods of time. I find a sous vide water bath to be an easy and cheap (compared to a tempering machine) way to accomplish this.
My chocolate has no (listed) fat other than cocoa butter, but it does contain soy lecithin(which I think is an emulsifier) and polyglycerol polyricinoleate(no clue what this is). Would either of those hinder the tempering process?
The only couverture chocolate I can find in my area is sold in a huge bag (far more than we need) for an insane price. And I can't taste it before I buy to see if it's something I'd like to give my family. I don't buy anything online.
Also, the other problems I'm having are with thermometers and temperatures in general. I've calibrated the thermometers and they're set correctly(I have a few around here...used them in different tests all with failed results). What always happens is, when my milk chocolate gets to 105F, I take it off the heat, add in some seeds, and all of a sudden it's magically at 115F. Is this because I'm using a pyrex bowl(keeps heat better then steel)? Should I be talking it off the heat at 95F then adding the seeds when the thermometer says 105F?
I have standard meat thermometers and a candy thermometer. I'm not excited about dropping a bunch of $ on a digital t that I'll never use again.
Also, your instructions here say to heat to 105 then drop to 87F and it's tempered. Whereas this article says to heat to 105, drop to 82, then reheat to 87: http://www.epicurious.com/recipes/food/views/How-To-Temper-Chocolate-356869 What's the benefit of dropping the temp then raising it?
Thanks for your help! I'm pretty good in a kitchen but it's so frustrating trying to figure this out!
What type of failure are you experiencing? Is the chocolate burning when it goes up to 115F or is it just not tempered after you bring the temperature to 87F?
What type of thermometer are you using? An alcohol based candy thermometer, dial thermometer, standard digital thermometer, or Thermapen? If you gradually heat the mixture, the speed of the thermometer won't matter much, but if you are rapidly heating (rolling boil steam in your double boiler instead of gentle steam from simmering water removed from burners), then the long delays in the thermometers (alcohol and dial thermometers can take 15-30 sec to get an accurate reading when temperature is constant, normal digital takes 10 sec, thermapens take 3-4 sec depending on model) can show a temperature up to 30 sec in the past and therefore not as hot as it really is. Also heat might not be evenly distributed and stirring the mixture when adding seed chocolate might provide a more accurate temperature than simply probing one area.
I don't bother with the temperature drop to 82 because it's not necessary. It's traditional to do it that way because on a marble slab, an experienced chocolatier can visually and physically tell when the chocolate has cooled to that point and to no that reducing the temperature further is too much. Dropping the temperature to 82F will just begin the formation of Form IV crystals in the cocoa butter which is not the desired crystal form. However, at 82F, Form V crystals are rapidly forming, so you want to be in that range to form crystals rapidly, then bring the temp back up a little to dissolve Form IV crystals and leave only Form V. This is unnecessary if you are not in a rush (that is, using a temperature controlled water bath method) or if you are using the seed method since the seeds will jump start the Form V crystals. The key is to keep the temperature in the 86-88F range for milk chocolate. The longer you keep it there, the more form V crystals will form over time.
In general, tempering is a really hard thing to do without either a lot of experience or the right equipment. For most home cooks, we don't temper often enough to do it by sight/feel, so equipment bridges that gap for us. The most vital piece of equipment is a good thermometer. A "calibrated" meat thermometer (assuming the one you mentioned is a dial type which has been set to 32F for ice water and 212F for boiling water) can be off in the mid range by as much as 5 degrees F. For beef, that's not a big problem. For chocolate making, it is. Especially, in combination with the lengthy reaction times (30+ sec). A candy thermometer, designed for measuring the gradual increase in temperature in sugar, are often just as inaccurate - the difference between hard ball, soft crack, and hard crack are over 15-20 degrees F each. In addition, neither thermometer is designed to be accurate in the range at which we temper chocolate (80-115F). In fact, a basal body temperature thermometer would be more accurate for chocolate tempering than either a meat or candy thermometer - but, unfortunately, I have not seen one that works in a reasonable amount of time between measurements. Spend $20-25 on a digital instant read thermometer like the Thermoworks RT600C and use it for all your thermometer needs in the kitchen. It's faster than other instant read thermometers of that price range (6 sec!). Only thing faster are the thermapens (3 sec with current model) which are currently $90.
What type of failure are you experiencing? Is the chocolate burning when it goes up to 115F or is it just not tempered after you bring the temperature to 87F?
I don't think it's burned-it still tastes good and is not separated at all. It's just not tempered-super soft and dull.
What type of thermometer are you using? An alcohol based candy thermometer, dial thermometer, standard digital thermometer, or Thermapen?
Alcohol and dial. I leave the thermometer in the melting chocolate constantly while stirring it, hoping that I'd get a constant and accurate readout.
If you gradually heat the mixture, the speed of the thermometer won't matter much, but if you are rapidly heating (rolling boil steam in your double boiler instead of gentle steam from simmering water removed from burners),
I will try the steaming off the burner method next. It's very possible I had the water temp too high, thus the too rapid heating.
In fact, a basal body temperature thermometer would be more accurate for chocolate tempering than either a meat or candy thermometer - but, unfortunately, I have not seen one that works in a reasonable amount of time between measurements. Spend $20-25 on a digital instant read thermometer like the Thermoworks RT600C and use it for all your thermometer needs in the kitchen. It's faster than other instant read thermometers of that price range (6 sec!).
I'll look for a digital t like the one you linked after I try out a couple more methods-my basal t, slower heating, and sous vide. I explained the latter to my fiancee and his eyes lit up...could be fun!
Did you have any thoughts on the ingredients in the chocolate I should be looking for? Not sure where you are but in my city in Ontario, the choices of good chocolate are limited to a bulk food chain(the choc is low quality there from what I've seen) and so-called higher end chocolate bars. I'm avoiding all that contain any fat other than cocoa butter, though.
The ingredients you listed seem fine to me. I don't know what chocolates are available in your city, but in the U.S., I've found that most supermarkets carry Guittard and Ghirardelli. Both brands are relatively inexpensive and work consistently well. Other brands that are commonly carried (but not necessarily as widely available here) are Lindt (also relatively low cost), Valrohna (expensive but most people like the flavor over the majority of other brands), Dagoba, Scharffen Berger, and Endangered Species. All of these brands work well and only have cocoa solids, cocoa butter, lecithin, vanilla, and sugar as their ingredients (and milk if it's milk chocolate). Make sure if you buy bar chocolate to check if they've mixed in other stuff like fruits, berries, nuts, mint, etc.
I'll look for a digital t like the one you linked after I try out a couple more methods-my basal t, slower heating, and sous vide.
I should probably rephrase and say that I recommend getting the RT600C over all other instant read digital thermometers other than the Thermapen. It's likely that any other digital thermometer you find will take 10 sec to get an accurate reading. I feel like 10 sec is slow enough that eventually you'll get a better thermometer, so why not just get the 6 sec one to begin with.
The Ghiradelli C's I see in my area are exclusively the little shells-you know the gift boxes you give to dinner party hosts. I'll look for the others you mentioned. There is a Lindt store near here and that's the first place I went to, but they were rude, unhelpful, and laughably overpriced. I will not do the chocolates at all if going to Lindt is my only choice.
I should probably rephrase and say that I recommend getting the RT600C over all other instant read digital thermometers other than the Thermapen. It's likely that any other digital thermometer you find will take 10 sec to get an accurate reading. I feel like 10 sec is slow enough that eventually you'll get a better thermometer, so why not just get the 6 sec one to begin with.
Noted. I'll look for the brand in my town (for an odd reason there's a great resto supply store here), but I don't shop online.
Stirred vigorously after that for a bit, I guess to try to mimic spreading it over a marble slab or disperse the heat. I had to use the fridge for two minutes to get the chocolate covered cookies to harden, but after that they didn't melt. I don't own a thermometer so I can't know for sure what the chocolate's temperature was.
I can't say they're *shiny*, but they do snap, so yay!
Just some encouragement to the people reading this who don't own the fancy equipment. I'm sure you can figure it out through some trial and error--people were making chocolates long before thermometers were common and affordable.
Could it be that the salt on the pretzels is dissolving, thereby causing added moisture (or an unknown reaction) and blooming? I'm not sure how you would solve such a problem though. Consider chocolate coating something without a salt garnish and see if you have having the same troubles. That way you can at least figure out if the problem lies in technique or not.
Because they're chocolate chips they may well have additives designed to help them maintain their shape at a higher temperature - this is probably what's interfering with your tempering!
Also in my experience go with a different brand too, lindt are good as previously mentioned - if you're in the UK I've had consistently good results with green and blacks too. :)
After tempering chocolate at 86-88 degrees, by what method is the chocolate brought to room temperature? If lowering the temp to 82 degrees forms type lV crystals that are undesireable, how do we get it lowered to room temp. Do we do so by lowering the temp fast by putting it in the fridge or freezer? Or by lowering it gradually even though some undesireable crystals will form?
Just let it settle to room temperature. Don't worry about the creation of type IV crystals at this point because no matter what you do the cocoa butter will form "undesirable" crystals because what isn't crystallized has to crystallize into some form once the chocolate cools. In fact, Type IV is preferred to Type III is preferred over Type II, etc. , so letting it cool slowly is probably best.
Thanks for this great article on chocolate tempering, as would be expected from an engineer!
I've got a question regarding storing the finished products, for example, truffles that have been coated in the tempered chocolates. I will be making these in a hot tropical country in summer and I'm not sure if I should keep them in the fridge(4C) or room temperature(28Cish). Would they lose the shine if I were to keep them in the fridge?
Cheers and I hope to hear from you soon!
Adrian
12-16'C is "in the range"
I temper with a Revolaton II machine and cool in polycarb. molds.
I believe the chocolate is tempered, because the one time I poured it too early (not waiting for the ready light) the taste was bad.
I suspect it's heat and humidity. I live in NYC and I cannot control the heat in the winter. But now that the weather's turning warmer, and more humid, I'm getting more problems. I cannot air condition the ktichen itself.
Am I right about the climate? Are there any other factors I ought to look at?
Such an informative group. But, alas, I am still left wanting.
Q: I would like to 'make' my own chocolate using cocoa powder. I can't find a decent recipie for this. Does anyone have any suggestions?
Q: Can I use 'standard' butter instead of coca butter- it's really difficult to get here in NZ (almost impossible, unless you live in the main centers)
Q: How do I temper my own cooked chocolate? Do I still go above 41c initially then add my chocolate to cool it down to 31?
Thanks :unsure:
I am a beginner in chocolate tempering and need your help:-)
For my first tempering/molding experience I bought about 2 pounds of Lindt 85% chocolate (in a bar form). The quality is very good, but it's a little too bitter to my taste, although I like dark chocolate. (I tryied to make a ganache for chocolate truffles, and the proportion 1:1 aka chocolate:heavy cream resulted in not very sweet, almost too bitter taste.)
Is there any ways I could sweeten this chocolate and use it for tempering and molding?
Thank you very much for this great article, for your patience, and thank you all who contributed to make this article even more helpful. I read everything!
I melted ghirardelli premium baking bar white chocolate bars in a double-boiler fashion (metal bowl over hot water). After the water came to a simmer and kept it low, I put the large bowl over it. I stirred 3/4 of the two broken up bars until melted. Then I removed from heat and added the last 1/4 of the two bars and stirred. I replaced it over the heat and stirred until all was melted and smooth. I poured spoonfuls over the caramel pecans. It was thick enough to smooth over the candy, but not run onto the pan.
It never did harden. I've put it in the fridge to see what happens.
what went wrong may be a very long Q&A session.
regardless, one does what one must and chilling it is not a bad start - excepting only for short period.
tempering affects the crystalline structure of the chocolate which then affects the texture as it "sets up" when cooled.
as this is a mixture for a filling with peanut butter (high fat) odds are - lacking the recipe / finished product - just melt&mix will be okay.
anyway, just wanted to ask if anyone has used coconut oil with their chocolate before, and if they have did it turn out well? (also, it was only maybe a Tsp)
its quality varies by the amount of coca fat & solids.
tempering is a process which affects how the sugar "crystallizes"
sugar is a bit of an odd beast - it can crystallize into small / medium / large structures at that is what one observes in the issue of "gooey" to "crisp"
which is unfortunately not related to "whatever marketing name" is on the label.
if the label gives a clue as to fats vs solids vs sugar content, you can - with experience - decipher how best to work with that particular brand, but 'chocolate' is not 'chocolate' when it comes to treating everything sold as 'chocolate' in a similar matter.
The recipe (�Maman Blanc�s Chocolate Mousse�) instructs whipping in a 1/3 of the whipped egg whites into the melted chocolate (to loosen the mixture) before folding the remaining 2/3 in.
No matter how quick I work, as soon as I add the egg whites to the chocolate, the mixture becomes too stiff to enable easy folding-in of the remaining whites and my mousse is lumpy.
I have tried whipping the egg whites less stiffly and also keeping the chocolate as cool as possible so that the �shock� of the, relatively cold, whites on the warm-ish chocolate does not cause it to seize. Perhaps my chocolate is too cold? Any help would be very welcome!
after adding some egg white to the chocolate to 'lighten' it...
(depending on what is being mixed this technique is often called "tempering")
you then continue adding whipped egg white to that 'lightened' chocolate mix...
that maybe the problem - try:
adding that 'lightened mixture' slowly, while whisking - to the remaining egg whites.
two possible causes for the lumpy outcome:
1 - a little bit of water added to (melted) chocolate can cause "seizing" - lumps; eggs whites have 'free water' floating about....
2 - less likely, but the cold egg whites dropping the temperature of the chocolate mass, causing the lumps.
it's easier / more successful to drizzle a hotter / heavier component into the lighter component _while mixing_ - a 'little bit' of the hot/heavy bit incorporates more readily than the reverse.
it's easier / more successful to drizzle a hotter / heavier component into the lighter component _while mixing_ - a 'little bit' of the hot/heavy bit incorporates more readily than the reverse.
Does this hold true in general?
Say I want to and beaten egg whites to a flour & egg mixture. Does adding the thick batter to the whites work better than the reverse?
I'd venture to say, mixing a trickle of "thick" stuff into a thin "fluid" to make it thicker is easier to achieve a homogenous mixture - than attempting to mix a little "thin" stuff into a "thick mass" - it's all a question of mechanics except for the temperature issue.
whether the directions call for stir or whisk or fold.
the basic principal is "how easy is it to mix-to-homgenous?"
"in cases" there are issues regarding "temperature" - dropping an egg yolk into a hot white sauce is far more apt to result in "scrambled egg" than 'tempering' the egg yolk with smal(ler) amounts of hot white sauce.
the other notable "issue" is specific to chocolate - a little water in chocolate = seizing; a lot of chocolate into a little water = no so seized....
souffle 'prep' is a classic example of that.....
I'd venture to say, mixing a trickle of "thick" stuff into a thin "fluid" to make it thicker is easier to achieve a homogenous mixture
Doh! This almost qualifies as an AHA moment; I've just been doing whatever the directions called for, but of course you're right. Thanks.
I often fold ingredients with my hand: faster and easier and does a better job than using a spatula.
egg white starts to set up at 140'F and gets completely firm at about 155'F
you can use that for a guideline, but remember as soon as the hot stuff hits the cold stuff, the hot stuff cools off and the cold stuff warms up. bottom line to that is: the chocolate can be warmer than 155'F without cooking the egg whites / creating lumps.
constant stirring / agitation is required, however.
I mean, coconut oil is REALLY strange! Goes from solid to liquid over a couple degrees, or less. Ain't no in-between -- the phase change is total, complete and almost instantaneous.
My question: I'd like to make a chocolate bar by adding roasted (and cooled) seeds to my tempered chocolate for taste and texture. Will this this interfere with the temper? Any help gratefully received as I've scoured the internet in vain for intelligence on how added ingredients affect temper.
I start with Callebaut chocolate, with absolutely no wax, paraffin or anything else, this is high-end melt-in-your-mouth luxury, and some of the hardest to temper because you get NO HELP from the chocolate itself. I chop it into small chunks and melt it very gently in the microwave, on about 4-5 power, stirring often, until it's barely melted - just warm, never hot. It's really easy to burn and takes a LONG time to temper if it's too warm.
Then temper by stirring gently and pretty constantly with a silicone spatula. Once it starts to feel cool-ish, test by dabbing a bit onto wax paper. It's ready when this dab hardens shiny and snaps in 3 minutes or less of sitting on the wax paper. The process takes time and patience, but it works. I think of it as super-cooling the chocolate: essentially keeping it liquid by stirring as it cools below its usual hardening temperature. This does not contradict the "seed" idea, it complements it: the "seed crystals" are forming as you super-cool the mass, but they don't have a chance to coalesce because of the stirring. Thus, the chocolate stays liquid. Then, it hardens super-fast after dipping, and you get a nice shiny surface because nothing has a chance to separate while the hardening happens.
So, once it's tempered I pour some (the part I'm going to use immediately) into a Pyrex baking dish, maybe 2-3 inches deep - this is my dipping bowl - the rest goes into the oven with the light on (oven is off, just the light is on). The part in the oven stays just barely warm enough to be melted.
Back to the dipping bowl:as I am dipping the chocolates, I add some from the oven whenever the chocolate in the dipping bowl gets too low (or too thick). I stir to mix and re-temper (this goes pretty fast - usually around 3-5 minutes because it's so close to the right temperature already) and keep dipping. I have found that keeping the extra in the oven saves scads of time!
It sounds a bit tedious and time-consuming, but it gets faster as you get good at it, and it's by far the most foolproof method I've found in almost 30 years of home-dipping without a tempering machine. I do a few hundred chocolates each year for Christmas and usually get them all done in a single day.
so.. I hope this helps someone... happy dipping (and tempering!)