| View previous topic :: View next topic |
| Author |
Message |
Cooking For Engineers
Joined: 10 May 2005
Posts: 16776765
|
 Posted: Wed Jan 19, 2011 6:05 pm Post subject: Sous Vide: Sous Vide Cooking at Home Setup Guide Posted: Wed Jan 19, 2011 6:05 pm Post subject: Sous Vide: Sous Vide Cooking at Home Setup Guide |
 |
|
This article covers a variety of different ways to put together a sous vide cooking station at home. For some people, all the equipment they need for some of the simpler configurations will be in their homes already enabling them to try out sous vide cooking at little or no additional cost. For others, one or two extra components will be all that is needed to get started. My hope is that, through this article, I'll provide enough information to both lower the barrier to entry for sous vide cooking at home and to provide reasonable upgrade paths for those wishing to increase the precision and flexibility of their sous vide setup.
To make this guide easier to read and digest, I've divided the components needed for sous vide cooking into two main sections. The first I'll cover is the temperature controlled water bath. The second is the vacuum sealer. As described in the Introduction to Sous Vide article, sealing ingredients in plastic bags with minimal air and cooking the food-filled bags in temperature controlled water is a relatively new, but versatile cooking technique. Like all cooking techniques, it is not the perfect cooking method for all types of foods, but, when used in the correct situations, produces food with taste and texture superior to more traditional techniques, can be very convenient, and can make food safer to consume for the immune compromised (depending on how sous vide cooking is employed).
A future article will cover more information on food safety when cooking sous vide, but I'll make a few notes here and there in this article where appropriate.
My Favorite Setups for the Home
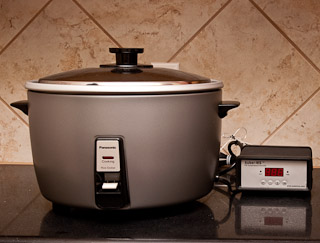
Before I begin, I'll describe my two favorite sous vide setups for the home. For bagging, I either vacuum seal the ingredients with a FoodSaver or, for meats of uniform shape cooked a relatively short time (such as one hour to two hours), a quart or gallon sized Ziploc-brand Freezer bag (which random people on the internet claim is safe for use up to 90.5°C (195°F); a few calls to S.C. Johnson & Son, Inc. did not shed any light on the situation - more at the bottom of the article on this). In most cases, you only need the plastic bag to hug the food tightly so the water bath can have maximum contact with the surface it is trying to heat, so the vacuum is not as important. Odd shaped items (like chicken wings) benefit greatly from the shrink wrap effect of vacuum sealing, so for those foods (as well as foods that need to be cooked at 82-85°C (180-185°F) such as root vegetables) I recommend using a vacuum sealer with simmer proof bags. For my water baths, I use a Panasonic SR-42HZP 23-cup (46-cup cooked) rice cooker with an Auber Instruments PID Controller and thermocouple. When cooking a large quantity of food, I use a PolyScience Sous Vide Professional Immersion Circulator in a 25 L polycarbonate tub with a couple 1/4 hotel pan lids to reduce water loss from evaporation. For small quantities of food, I have not found the lack of circulation to be a problem given a volume of water much greater than the food being heated. (The natural convection currents seem to be enough to keep an even temperature in most cooking vessels so long as the bag of food does not cover the entire area of a cross-section, thus dividing the volume into two separate portions.) In addition to these components, I keep a Thermapen on hand to double check water temperature in case of thermocouple failure or miscalibrated temperature controllers. (Many thermometers can be off by a couple degrees, so I strongly recommend a highly accurate thermometer that is factory calibrated to a standard and can be recalibrated later if necessary. The difference between a few C° might not be noticeable on some ingredients, but on others, like eggs, can have drastic effects to texture.)
Temperature Controlled Water Bath
Of the two main components, the water bath is the more complicated (and has the most options... or the most opportunities to be creative), so I'll cover it first.
I tried to break the various ways to put together a temperature controlled water bath into a few "categories" which I then attempted to rank starting from potentially lowest cost to highest cost. More or less, this also roughly translated to least effective to most effective systems. For these categories I tried to price out a complete "lowest cost" solution as well as a "mid-cost" solution. I left out "high cost" since the sky is pretty much the limit (for example, the categories involving a pot could use a $500 copper cauldron if you wanted). All prices quoted are for new components, rounded for readability, and current at the time of the initial publication of this article. Used equipment may be available at lower cost, but remember that anything not intended or not previously used for food preparation should be thoroughly sterilized. (For example, used laboratory equipment like an immersion circulator might not be clean and may have been used in research that may prove dangerous to the health. Boiling is often not enough to sterilize in such cases and a full regimen of water boiling, vinegar bath, bleach solution bath, alcohol bath, and second water boiling should probably be employed.)
I also left out any sous vide setups that required disassembling components or involved any steps that required technical expertise significantly outside the scope of this article (like soldering, cutting wires, or even sawing). One could argue that this decision makes this guide less than complete, but given the number of options and length of this guide, I believe most readers will forgive me.
In many of the earlier examples, I include the cost of a $20 probe thermometer such as the Polder 362-90, but if you already have a thermometer (even a non-probe model) that works in the range of 49-88°C (120-190°F), then you can use that to check the temperature of the water bath instead.
I also include the use of a $12 silicone steamer such as the Chef'n Sleekstor VeggiSteam which can be used to keep the plastic bags from resting on the bottom of the pot or cooking device. This silicone steamer measures 215 mm (8-1/2 in) in diameter and fits most pots nicely, but any steamer insert or rack that fits the pot or device and elevates the bags of food should work well. In many cooking applications, leaving out the steamer insert does not make a noticable difference so long as the temperature of the water is well controlled (such as in the rice cooker with PID controller setup).
Large Pot in Warm Oven
Heat Source (during cooking): Oven
Heat Adjustment: Manual
Lowest cost: $33
Mid-cost: $60
Method: The key elements in this method is the size of the pot (amount of water), the thickness of the pot (a big heavy cast iron pot would be ideal because it heats up and cools down slowly due to its mass), and how low the temperature controls of your oven go down to.
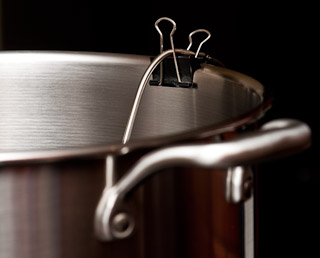
Preheat the oven to the lowest temperature above the target temperature which will be the lowest temperature setting in most cases (the lowest setting on my oven is 77°C (170°F)). Fill the 3/4 of your pot with hot water and warm it on the stove to the target temperature. Clip the probe (I use a binder clip for this purpose) of the probe thermometer to the side of the pot with the probe tip submerged in the water. Be careful not to get the junction between the cable and the probe wet (most low cost probe thermometers do not have sealed junctions between the probe and the cable and getting them wet is the most common way of damaging them). Place the food in the water, cover the pot as best as you can (the thermometer probe may get in the way a little), and put the whole thing in the oven on a rack set near the bottom. Over time, the water temperature should rise above the target temperature due to the oven being warmer than the target. At that point, turn off the oven and wait until the temperature drops back to the target temperature. Turn the oven back on at this point and repeat for the duration of the cooking time.
Having a probe thermometer is very useful in this scenario since it allows the temperature to be checked without opening the oven which can drop the temperature considerably. If the oven door is never opened, temperature changes are relatively slow, so be aware that even after you turn off the oven, the water will continue to warm up (although slower and slower) until the oven temperature drops below the water temperature. If you take this into account and turn off the oven a little early and turn it on a little early, you can get a relatively stable (within 1-2 C°) water bath with human intervention only every 5 to 15 minutes depending on the volume of water (the more water the slower the temperature changes) and the oven.
Ice Chest with Hot Water
Heat Source (during cooking): None
Heat Adjustment: Manual
Lowest cost: $40
Mid-cost: $70
Method: The ice chest is first filled with hot water a couple C° above the target temperature (for example, 60°C/140°F). This isn't as easy as it sounds since the volume of water can be quite immense. The easiest way is to first fill a large pot full of water and pour it into the ice chest. Then, boil a large pot full of water and pour it into the chest. Close the lid of the chest to slow down the heat loss (mainly due to evaporation), and repeat until you have enough water. You'll need more hot water than room temperature water due to the heat loss from the ice chest as you wait for the water to heat up. After stirring briefly, measure the temperature of the water and adjust by adding more hot water or cold water until the desired temperature has been reached (a couple degrees above your target temperature). Place the probe of the probe thermometer into the water while being careful that the junction between the probe and the cable does not get wet (that's the number one reason why the probes die). One way to help prevent water from getting into the probe is to place it in a large waterproof bag while taking care that the opening of the bag is outside of the cooler (try taping the opening to the side of the cooler so it doesn't slip in when you open or close the lid). Program the thermometer to sound an alarm once the water temperature drops below the target temperature. Place the bagged food into the chest and close the lid. It's probably a good idea to heat some more water so it will be ready when the water temperature drops below the target temperature. Add hot water as necessary throughout the entire cooking time.
Because of the nature this particular technique, I don't recommend foods that require long cooking times (certainly not 24-72 hour long recipes!).
Stovetop with Thermometer
Heat Source: Range
Heat Adjustment: Manual
Lowest cost: $45
Mid-cost: $72
Method:
A large, heavy (or heavy bottom) pot on a burner with a thermometer clipped to the side can work effectively for many sous vide applications. The two options that I have listed above are inexpensive starting points, but, if you already have a large, heavy pot (such as a Dutch oven), then that will probably work better than the two entry-level examples shown. Simply take your large stock pot or Dutch oven, place the silicone steamer insert on the bottom, and fill it 3/4 full of water and bring it up to the target temperature over a burner. If you overshoot, you can bring the water temperature back down by adding small amounts of cold water from a cup. Some patience will be needed to adjust the burner's magnitude to maintain an even water temperature (chances are you will not succeed, but you should be able to keep the temperature somewhat stable and be able to walk away for a few minutes at a time). If you clip the probe of the probe thermometer to the side of the pot (I do this by running the probe through the tabs of a large binder clip), you can program the thermometer to alert you when the temperature rises outside of the desired range as well as below the desired range. Once the water temperature is stable, place the bagged food into the water to begin heating.
One variation of this method is to use a portable induction cooktop that has the ability to keep water at a warm temperature. The induction cooktops that I've used have rather coarse granularity (15-30 F° increments) and do not result in exactly consistent water temperatures (both consistent over time and consistent with the digital setting). If you attempt to use the cooktop's temperature setting, I recommend testing the temperature with a thermometer over a thirty minute period to get a feel for the water temperature at a given setting. Different pots and different settings will result in different water temperatures, so it may be possible to get the water temperature in a range that is useful for sous vide cooking.
Putting a lid on the pot is a personal choice, just remember that if you stabilized the temperature without a lid, then placing a lid on will increase the temperature (and vice versa). So, be consistent - if you use the lid, use it all the time; if not, keep it off.
Rice Cooker or Slow Cooker or Food Warmer without External Controller
Heat Source: Built-in
Heat Adjustment: None
Lowest cost: $52
Mid-cost: $182
Method: This option takes a little luck to get working and is less flexible than the previous two because the temperature of the water bath can't be altered because no external control source is available (unless you sit there and toggle it on and off). If it does work in your situation, it does allow the operator to walk away and not have to "tend the fire".
Before attempting this, fill your cooking device with water and set it on the "keep warm" setting and walk away for a few hours. Measure the temperature to determine the equilibrium temperature of your device. Each device will be a little different. For example, my small rice cooker settles at 64°C (147°F) while my industrial rice cooker settles at 85°C (185°F). For this technique to work, we're at the mercy of whatever the "keep warm" temperature is for your device and are limited to the cooking applications for that temperature. Here's a rough guide ("unpasteurized" is noted where the water bath temperature is not high enough to kill the most common pathogens over time; these food items should be heated to the desired temperature and consumed within four hours total cooking and eating time by the non-immune compromised):
38-43°C (100-109°F): very rare to rare tuna (unpasteurized)
39-49°C (101-120°F): very rare to medium-rare salmon (unpasteurized)
49-55°C (120-130°F): medium-rare to medium fin fish and shellfish (unpasteurized)
55-60°C (131-140°F): beef
57°C (135°F): pasteurizing eggs (but keeping them uncooked)
60°C (140°F): pork and chicken (pink but pasteurized)
63-65°C (145-149°F): poached eggs
70-80°C (158-176°F): rendering fat (lard, tallow, etc.)
80°C (176°F): duck confit
82-85°C (180-185°F): root vegetables
You can also try to alter the settling temperature by removing the lid to the device thus providing two possible cooking temperatures.
Once you've determined the temperature your device "keeps warm" at, you can simply run the device at full power to that temperature and then switch it to "keep warm". Wait a few minutes for the temperature to settle (check with a thermometer) and insert your food.
Pot with bucket heater and PID Controller
Heat Source: Bucket heater
Heat Adjustment: External PID Controller
Lowest cost: $170
Mid-cost: $230
Method: This is the lowest cost solution involving a type of controller called a PID controller. Essentially, the controller turns on and off the device plugged into it at a rate dictated by a feedback loop algorithm. You can think of it as turning the device on full power when the temperature is much lower than the target, then reducing the power level as it gets closer, then turning off the device as the temperature overshoots, and then gently controlling the power level to maintain the temperature. In reality, external heating devices are usually only on-off devices, so the PID controller approximates variable power by pulsing the power on and off. The longer the pulses, the higher the power; the shorter the bursts, the less power is provided. Since heating elements take time to cool off and warm up, this does a good job of approximating the range from 0-100% power. The PID controller in this section and the ones below can be programmed to better match the cool down and heating rates of your cooking device (in this case, a bucket heater, and, in the case below, a rice cooker). The PID controllers listed here are all rated to handle 1800 W which should be sufficient for most heating devices. If you are using a different PID controller, please check the maximum power rating as a fire hazard can present itself if the heating element used draws more power than the controller is designed for.
These PID controllers also come with thermocouples (used to measure temperature). The thermocouple probes are sealed and watertight, so unlike the Polder probe thermometer, there is little fear that water will destroy your thermocouple (unless the seals fail).
Fill a large container with water. This can be a large stock pot, Dutch oven, ice chest, or any other large container. Insert the bucket heater (following the directions according to the heater - many need to be fully submerged to work properly) into the water being careful to position it so the heating element does not touch the container directly if high heat can damage the material of the container (such as the plastic in an ice chest) - you can use a block of wood or something heat resistant as a barrier is needed. Plug the bucket heater into the output of the PID controller. Place the thermocouple connected to the PID controller into the water (preferably away from the heating element). It is important that the thermocouple be in the water when using the PID controller. Otherwise, the PID controller's feedback loop will have the wrong temperature feedback (probably in the air on the counter next to your cooking vessel) and try to run your heating device nonstop in an attempt to raise the temperature. This can be a dangerous (fire warning) situation. (Boiling off all the water in your cooking vessel is not going to end well.) Plug the PID controller into the wall socket, turn it on, and program it for the desired temperature. If the water volume is too large, the bucket heater may not be able to bring the temperature up in a reasonable amount of time. In this case, you'll need to either use less water or a more powerful bucket heater.
Once the water has reached the desired temperature, place the bag of food into the water, preferably away from the heating element.
Please note that PID controllers can be off by a few degrees (even though it may be precise (that is, it keeps the temperature within a degree), the accuracy could be off and 55°C might be 53°C in reality), so double check the reported water temperature with a measurement of the actual water temperature using a calibrated thermometer. (Again, I really like the Thermapen.)
Rice cooker / slow cooker / food warmer with PID Controller
 Heat Source:
 Built-in
Heat Adjustment: External controller
Lowest cost: $182
Mid-cost: $312
Method: This setup requires an electric rice cooker, slow cooker, or food warmer (an electric device that is designed to keep a food pan or hotel pan hot for service) with a simple mechanical switch or dial that turns the device on. Advanced electronic versions of these appliances will not work because the PID controller will attempt to turn the device on and off rapidly to control the heating elements. In electronic rice cookers, for example, turning the power off and then on does not cause the device to start cooking, but, instead, puts the device into a "wait" state where it waits for user input to program it or start it. Luckily, mechanical switch controlled devices are still readily available, and, as an added bonus, most are cheaper than their electronic counterparts.
In the rice cooker example, fill the interior vessel with water and place in the rice cooker. Most rice cookers automatically turn the mechanical switch off when the vessel is removed, so depress the switch once the filled vessel is back in place. Insert the thermocouple of the PID controller into the water along with the silicone steamer insert (to protect the food from the heating elements at the bottom of the rice cooker). (I actually don't run my rice cookers with the steamer insert normally because, once the water is at the target temperature, the bottom of the rice cooker does not get much hotter than the surrounding water so long as the water is free to circulate around the food pouch.) Place the lid on the rice cooker and turn on the PID controller. Program the controller to the desired target temperature. Once the water bath has settled at the target temperature, place the food bag into the rice cooker.
Using a device with a lid saves power and water. Because the water isn't evaporating directly into the environment, water loss is prevented and heat loss is reduced which causes the PID controller to turn on the cooking device for less time. In fact, the rice cooker with PID controller is the most efficient (in terms of water and power consumption) sous vide setup I have tested. (The average measured power draw to sustain a temperature of 55°C (131°F) in my large rice cooker with the Auber PID controller is about 8 W!)
Auber Instruments has suggested that a rice cooker is superior to a slow cooker because the heating elements in a rice cooker are at the base while the slow cooker heats from the sides. Apparently, heating from the bottom causes natural convection currents to circulate more effectively than heating from the sides. I have not done any testing to confirm or refute this theory.
Another reason I like rice cookers is that the interior vessel can be removed and carried over to the sink to be poured out and washed. Many slow cookers also have this feature.
Pot with Air Bubbling Heating Element and PID Controller
Heat Source: Submerged heating element
Heat Adjustment: External controller
Cost: $300
Method: Fresh Meals Solutions sells these kits that enable you to use their heating element along with an air bubbler (that agitates the water) in a water bath (either the large polycarbonate container in their kit or a pot or vessel you already own). Treat this system as you would the previous method: fill the vessel with water, insert the heating element and thermocouple (and bubbler), turn on and program the PID controller to the target temperature, and insert food when stabilized.
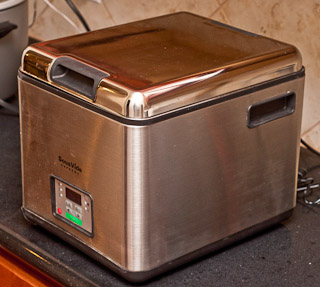
Stand Alone Water Bath Appliance
 Heat Source:
 Built-in
Heat Adjustment: Built-in
Lowest cost: $300
Mid-cost: $400
Method: For many readers, this will be the best solution. The three products listed here are complete standalone appliances. They are essentially a vessel for holding water, a heating element, and a PID controller all built into one device. (There's no thermocouple to forget to put into the water and minimal fire hazard since all the devices have auto-shutoff in case the water fully evaporates, etc.)
The smallest of these is the new Sous Vide Supreme Demi which has a 9 L water bath vessel. It's 20% smaller than the bigger and 50% more expensive Sous Vide Supreme (11.2 L). Neither of the Sous Vide Supreme models come with removable interior vessels (a slight cleaning problem if a bag bursts, but not insurmountable).
The Sous Vide Magic Water Oven is the largest of these at 14 L and has air bubbling for circulation/agitation as well as a removable interior pot for easy clean up.
Usage is simple - just fill to the specified water level, program the target temperature, and insert the food when the device beeps telling you it has stabilized.
Costco.com is currently running a great Sous Vide Supreme Demi deal which includes the appliance along with a vacuum sealer, two boxes of bags, and Douglas Baldwin's excellent book, Sous Vide for the Home Cook, all for $350.
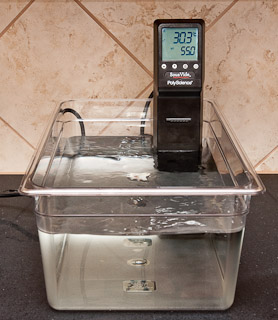
Immersion Circulator
 Heat Source:
 Built-in
Heat Adjustment: Built-in
Cost: $800
Method: Immersion Circulators are generally considered the gold standard for controlling the temperature of water baths both in the kitchen (for sous vide cooking) and in the laboratory. Just place the device into a vessel filled with water (a large pot, large and deep hotel/food service pan, ice chest, even the kitchen sink), set it for the desired temperature and watch it rapidly heat the water by taking in water, heating it, and pushing the warm water out to circulate quickly. Due to the constant water movement, the temperature is extremely stable (I measured 0.1 C° drifts on both PolyScience units with the cheaper Sous Vide Professional about 0.4 C° off the target temperature of 55°C and 0.1 C° difference from actual on the PolyScience 7306 where each was running in a 25 L open air polycarbonate vessel.), but that constant motion also contributes to a larger amount of water loss. (Luckily, adding more water does not drop the temperature for too long due to how quickly the unit heats water.) Covering the open areas of the water bath with lids or plastic wrap helps reduce water loss.
Due to the even temperature control in very large volumes of water, an immersion circulator allows cooking large quantities of food sous vide without issue. One thing to keep in mind, though, is to match the cooking vessel to the quantity of food being prepared. A large cooking vessel with only a few eggs could result in broken eggs as the circulator pushes water around the vessel causing eggs to slam into the walls and each other. When the vessel is filled (or mostly filled) with a layer of eggs, this is no longer an issue. Likewise, a single bag of short ribs will likely be picked up by the current and "swim" around the vessel as it cooks (which is not really a problem and somewhat entertaining to watch).
These devices typically mount to a cooking vessel by screwing a clamp onto the side. You can also build a platform for the laboratory models to rest on top of the vessel. (The PolyScience Sous Vide Professional model is shrouded by a sealed plastic container making it possibly easier to clean but also unable to be mounted with standard platform brackets.) Platform brackets or mounts that span the water bath and allow the secure positioning of the immersion circulator in the middle of the bath are available from PolyScience as well (for a price).
The $800 PolyScience Sous Vide Professional from Williams-Sonoma comes with a 63-page introduction and recipe book by Thomas Keller (and until March 21, 2011, also comes with a free 20 qt pot and 25 L polycarbonate container).
Other common brands of immersion circulators include Techne, Grant, Roner, and Fischer Scientific.
Bags and Vacuum Sealers
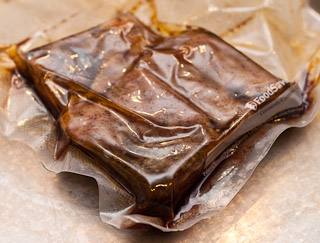 Before putting the food into a temperature controlled water bath, the food needs to be protected from the water (or we will be simmering or poaching instead) by something that will also enable the heat from the water to easily transmit itself into the food. Heat-safe (to simmering temperatures at least) plastic bags are used for this purpose. Using a vacuum pump to remove the air and seal the bag causes a shrink wrap effect which presses the plastic closely against the ingredients allowing for maximum heat transfer and prevents air bubbles which may lift the bag out of the water. (This may still occur if steam forms in the bag - just put a plate on top of the food to weigh it down in these cases.) Before putting the food into a temperature controlled water bath, the food needs to be protected from the water (or we will be simmering or poaching instead) by something that will also enable the heat from the water to easily transmit itself into the food. Heat-safe (to simmering temperatures at least) plastic bags are used for this purpose. Using a vacuum pump to remove the air and seal the bag causes a shrink wrap effect which presses the plastic closely against the ingredients allowing for maximum heat transfer and prevents air bubbles which may lift the bag out of the water. (This may still occur if steam forms in the bag - just put a plate on top of the food to weigh it down in these cases.)
A vacuum seal isn't always needed for good results, however. The use of a Ziploc-brand Freezer bag is adequate for most sous vide applications. (I did speak to a few representatives at S. C. Johnson & Son, Inc., the makers of Ziploc-brand bags, where they repeated said their bags had not been tested at temperatures where most sous vide cooking takes place. The medical and public health representative I spoke to said that the information they had was more concerned about the risk of burning if the bags lost integrity due to high heat and burst, and there did not seem to be an ingestion concern. Ziploc-brand Freezer bags are made of thick polyethylene which melts at 230°F, said another customer service representative, and they recommend staying away from boiling temperatures. Only use Ziploc-brand Freezer bags for sous vide applications if you feel comfortable to do so in light of the company's request for people not to use the bags in untested ways.) For higher temperature (vegetables, rendering fat, confit) and longer duration (three day short ribs, 36 hour skirt steak) recipes, I prefer the sturdier plastic and seal of a vacuum sealed bag. Another benefit of the vacuum sealed bag is that after cooking food such that it is pasteurized, properly handling the food (rapidly cooling and storing in the refrigerator or freezer) can allow the food to remain safe to eat for extended periods of time (up to 30 days if the food is kept in a refrigerator at 3.3°C (38°F); longer at lower temperatures).
Not all bags used with vacuum sealers are appropriate. Specifically, refrigerator bags are not usually simmer proof and the bags used in conjunction with the FoodSaver FreshSaver handheld vacuum pump (the zip top bags with a port for the vacuum pump) are not compatible with sous vide cooking. Use freezer bags or bags whose boxes are specifically marked as appropriate for simmering.
Countertop Vacuum Sealers
Low Cost: $55 Rival Seal-A-Meal Vacuum Sealer
Mid-Cost: $150 FoodSaver V2440 Vacuum Sealer
Countertop vacuum sealers often are equipped with just enough power to create a minimal vacuum. They are normally incapable of creating the strong vacuums used for some interesting new food preparation techniques such as compression (as in "compressed cucumber" or "compressed watermelon") and vacuum pickling. To do this, one must defeat the pump shut off in the countertop vacuum sealer (a procedure described on page 358 of Jeff Potter's Cooking For Geeks; while you're looking at that book, take a look at pages 262-263 as well) or acquire a chamber vacuum sealer (which also works much better with foods that contain liquids). (Trying to vacuum seal foods heavy with liquids can be a challenge without a chamber vacuum sealer. Hanging the bag off the edge of the counter while sealing and manually starting the seal as soon as the liquid is about to reach the clamp works most of the time as does freezing the liquid before vacuum sealing in a bag.)
Chamber Vacuum Sealer
Low Cost: $1800 MiniPack MVS 31 |
|
| Back to top |
|
 |
jm
Guest
|
| Posted: Wed Jan 19, 2011 8:52 pm Post subject: Oven + Pot? |
|
|
I'm surprised you aren't suggesting to use a regular (temp controlled) oven + a pot of water (dutch oven). I've done some experiments with this setup (but not cooked yet), and it looks like it should work.
Any reason you're not mentioning it?
Thanks. |
|
| Back to top |
|
|
Michael Chu
Joined: 10 May 2005
Posts: 1654
Location: Austin, TX (USA)
|
| Posted: Thu Jan 20, 2011 10:23 am Post subject: Re: Oven + Pot? |
|
|
| jm wrote: | I'm surprised you aren't suggesting to use a regular (temp controlled) oven + a pot of water (dutch oven). I've done some experiments with this setup (but not cooked yet), and it looks like it should work.
Any reason you're not mentioning it? |
Excellent suggestion. I didn't have it in the list originally because I hadn't heard of people doing this before and did not think of it when I was coming up with ways to keep the water baths warm. My first thought when you mentioned it was that my oven is too hot for sous vide since the lowest setting is 77°C (170°F) and in actuality it runs from 79-99°F (175-210°F) at that setting.
I just did a test with 4 quarts of water in a tri-ply clad stock pot heated to 55°C (131°C) which I covered and inserted into the oven set at 170°F. The temperature of the water bath rose steadily from 55°C to 60°C at the rate of 1 C° per 8 minutes. I then turned off the oven and left it. The remaining warmth in the oven heated the water up to a peak temperature of 61°C after 19 more minutes and then started to cool. Cooling rate was remarkably steady: losing 1 C° every 16 minutes. At these cooling and heating rates, this is definitely a great alternative. With a good thermometer you can keep the temperature fairly steady intervening only every ten minutes or so to turn on or off the oven (depending on the quantity and temperature of the food being cooked, the temperature rise could be much slower; by the time the oven is turned off to cool, the food might be warm enough to not noticeably affect the cooling temperature).
I'll write this up and put it in the list. Thanks! |
|
| Back to top |
|
|
vNate
Guest
|
| Posted: Thu Jan 20, 2011 10:58 pm Post subject: |
|
|
I've seen a nice chamber style vacuum machine sitting behind the counter at my local butcher shop. Once I get a PID controller setup, I'm planning on bringing along my seasoning (maybe frozen in ice cubes) and asking them to vacuum seal it with my meat in the store.
Just a thought... it's not like I'll cook like this every day.  |
|
| Back to top |
|
|
jm
Guest
|
| Posted: Sun Jan 23, 2011 7:14 pm Post subject: Oven + Pot |
|
|
| I must be lucky because my over starts at 100F. I'm experimenting to figure out what oven temp I need to set to keep the bath at a given temp. for example 145F gives me a continuous 135F bath; no need to watch it. Made some duck breasts with that yesterday, and they were amazing (just a little overcooked for my taste). |
|
| Back to top |
|
|
Michael Chu
Joined: 10 May 2005
Posts: 1654
Location: Austin, TX (USA)
|
| Posted: Mon Jan 24, 2011 10:07 pm Post subject: Re: Oven + Pot |
|
|
| jm wrote: | | I must be lucky because my over starts at 100F. I'm experimenting to figure out what oven temp I need to set to keep the bath at a given temp. for example 145F gives me a continuous 135F bath; no need to watch it. Made some duck breasts with that yesterday, and they were amazing (just a little overcooked for my taste). |
I'd love to get the brand and model of your oven. I've had to buy two ovens over the last ten years and both only went down to 170F. The first was a low cost Hotpoint that was quite accurate and the most recent one is a Whirlpool Gold that costs 3x more and is off by 30F or more. |
|
| Back to top |
|
|
gavin
Guest
|
| Posted: Tue Jan 25, 2011 3:18 am Post subject: Found a cheaper PID controller - your thoughts? |
|
|
Michael,
What are your thoughts on this controller (costs around $33), used in conjunction with this thermocouple (costs $20)? I read about using these devices in a sous vide setup here.
-Gavin |
|
| Back to top |
|
|
Michael Chu
Joined: 10 May 2005
Posts: 1654
Location: Austin, TX (USA)
|
| Posted: Tue Jan 25, 2011 9:09 am Post subject: Re: Found a cheaper PID controller - your thoughts? |
|
|
| gavin wrote: | Michael,
What are your thoughts on this controller (costs around $33), used in conjunction with this thermocouple (costs $20)? I read about using these devices in a sous vide setup here.
-Gavin |
The problem with that controller is that it cannot handle high currents without another relay. The article you link to suggests a low cost relay ($25) that should work (plus $2 for a power cable from Walmart that you'll need to cut, strip, and wire to the devices and a $10 plastic project box so everything isn't just hanging out and is reasonably protected from splashes), so you should be able to get a PID controller setup using these parts for $90 plus a little time.
The relay manufacturer encourages the use of a heat sink (as would I), but the author of the article you linked to said he did not detect any heat build up in the relay when he tested so he didn't use one.
Another thing to make sure is that the thermocouple is sealed and water proof. Many thermocouples go bad because water can seep in a the junction between the probe and the cable. For this reason, I always recommend the use of a backup thermometer to check the water bath temperature before and after cooking sous vide. |
|
| Back to top |
|
|
jm
Guest
|
| Posted: Thu Feb 03, 2011 4:25 am Post subject: 100F Oven |
|
|
My oven is a jenn-air expressions ww27430b.
I'm afraid it's pretty old though, as the web doesn't know much about it. |
|
| Back to top |
|
|
Michael Chu
Joined: 10 May 2005
Posts: 1654
Location: Austin, TX (USA)
|
| Posted: Thu Feb 03, 2011 7:26 am Post subject: |
|
|
| I've used a Jenn Air before and found it to be very nice. I haven't had much experience with them outside of that one time, but it would be interesting to see if newer models supported lower temperatures as well. |
|
| Back to top |
|
|
Jim Cooley
Joined: 09 Oct 2008
Posts: 377
Location: Seattle
|
| Posted: Thu Feb 03, 2011 6:38 pm Post subject: |
|
|
Sort of off-topic, but I had JennAire stove/oven and the oven always seems to run really slow even though a calibrated thermometer showed it was at the right temperature before and during cooking.
Never been able to figure that out... |
|
| Back to top |
|
|
Andy
Guest
|
| Posted: Fri Feb 11, 2011 5:54 am Post subject: |
|
|
Found this through Google and just thought I would throw out another option. I just finished up turning my crock pot into a PID controlled sous vide cooker for under $25. Granted I spent a lot of time designing it, but I did a write up and posted my source and schematic at
http://chiefmarley.com/Arduino/?p=3 |
|
| Back to top |
|
|
student01
Guest
|
| Posted: Tue Mar 01, 2011 7:12 am Post subject: cooking times |
|
|
Good day, I note that you have not indicated times for the cooking processes mentioned, simply temperatuers. Is there a reason?
student01 |
|
| Back to top |
|
|
Michael Chu
Joined: 10 May 2005
Posts: 1654
Location: Austin, TX (USA)
|
| Posted: Tue Mar 01, 2011 9:32 am Post subject: Re: cooking times |
|
|
| student01 wrote: | Good day, I note that you have not indicated times for the cooking processes mentioned, simply temperatuers. Is there a reason?
student01 |
Cooking times vary from ingredient to ingredient (as does temperature) and also vary from size and shape of the ingredients. I'll cover cooking temperatures and times for each recipe as I post them.
Sorry for the delay. |
|
| Back to top |
|
|
student01
Guest
|
| Posted: Wed Mar 02, 2011 10:37 pm Post subject: previous post |
|
|
Hi Michael, no apologies needed
student01 |
|
| Back to top |
|
|
|
|
You cannot post new topics in this forum
You can reply to topics in this forum
You cannot edit your posts in this forum
You can delete your posts in this forum
You cannot vote in polls in this forum
|
Powered by phpBB © 2001, 2005 phpBB Group
|

